Bracketing HDR in Real Estate Photography is essential for balancing bright windows with dark interiors, one of the biggest challenges photographers face. A single exposure often fails to capture both highlights and shadows, leaving photos either blown out or muddy. That’s where HDR bracketing (High Dynamic Range) comes in (learn more on Wikipedia).
By capturing multiple exposures and blending them into one, photographers can create images that feel natural, detailed, and appealing to homebuyers.
In this guide, we’ll cover:
- What HDR bracketing is and why it matters
- How many brackets you actually need (3, 5, 7, or even 9?)
- The best camera settings for consistent results
- A fast, repeatable workflow for real estate shoots
- HDR vs. Flambient: when to use each technique
- Pro tips gathered from experienced real estate photographers
What is Bracketing HDR in Real Estate Photography?
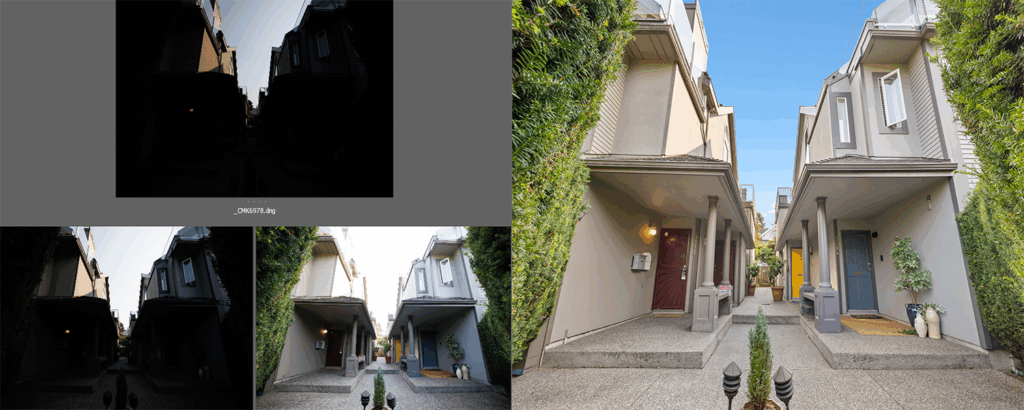
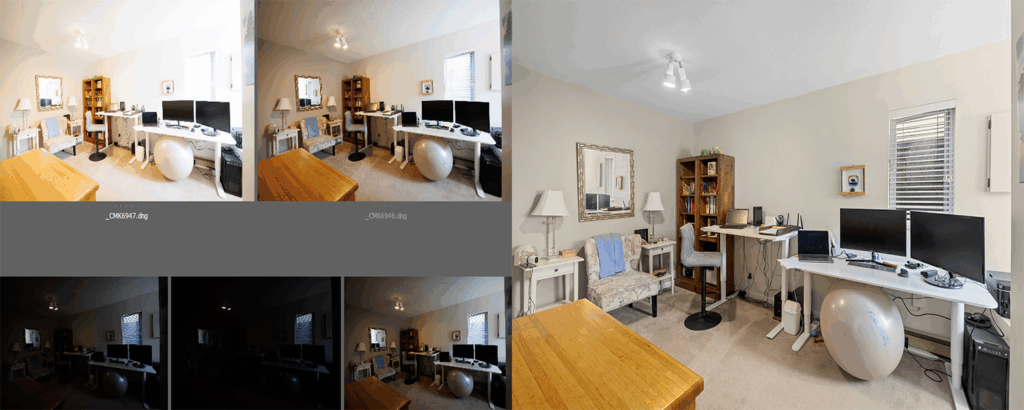
Bracketing HDR in Real Estate Photography is the process of shooting several images of the same scene at different exposures—typically one underexposed, one correctly exposed, and one overexposed. These shots are then merged into an HDR photo that contains detail in both highlights and shadows.
Common bracket setups include:
- 3 exposures (–2 EV, 0 EV, +2 EV)
- 5 exposures (–4 EV, –2 EV, 0 EV, +2 EV, +4 EV)
Why Bracketing HDR in Real Estate Photography Matters?
- Window detail: prevents blown-out highlights.
- Balanced interiors: brightens shadows without noise.
- Professional look: natural, true-to-life images that buyers trust.
Even though modern cameras have great dynamic range, HDR bracketing remains the most reliable way to deliver consistently high-quality real estate photos.
How Many Brackets Do You Really Need?
This is a hot debate among real estate photographers. Experiments and professional practice show:
- 3 brackets (±1 stop): Usually not enough for interiors; windows still clip.
- 3 brackets (±2 or ±3 stops): Usable in some cases, especially exteriors or low-contrast rooms.
- 5 brackets (±2 stops): Considered the “gold standard”—captures enough data for both bright exteriors and dark interiors without overwhelming your workflow.
- 7–9 brackets: Overkill. Creates huge files, slows down culling and editing, rarely adds visible benefits.
💡 Pro tip: For most interiors, 5 exposures spaced 2 stops apart is the sweet spot. It balances image quality with efficiency.
The Best Camera Settings for Bracketing HDR in Real Estate Photography
After thousands of shoots, professionals agree that these are the best camera settings for Bracketing HDR in Real Estate Photography, ensuring sharpness, clarity, and balanced exposures:
- Aperture: f/8 to f/9 for maximum sharpness and consistent depth of field.
- ISO: 200–320 to keep noise low.
- Focus: Manual focus locked around 5 meters or infinity to avoid focus shifts.
- White balance: Auto for interiors (can be adjusted later in RAW), Daylight/Cloudy for exteriors.
- File type: Always shoot RAW.
- Self-timer: 2 seconds to eliminate camera shake.
- Bracketing: 5 exposures, ±2 EV.
Set it once and shoot an entire property without fiddling between rooms.
A Fast Workflow for Shooting Real Estate
Efficiency is everything when photographing multiple homes a day. Here’s a workflow used by top professionals to shoot an average-sized house in 20–40 minutes:
- Park far away: Avoid having your car visible through windows.
- Prep the property: Turn on lights, open blinds, close toilet lids, and tidy small details.
- Tripod height: Start around counter height in kitchens and adjust slightly per room.
- Three-wall rule: Always include three walls in your frame to add depth.
- Work like a SWAT team: Clear one room before moving to the next to prevent missed shots.
- Mind reflections: Step out of mirrors and shiny surfaces whenever possible.
- Exteriors: Extend your tripod fully, shoot straight-on and angled views, and include both the house and lot lines.
This simple system keeps your shoots consistent, professional, and fast.
HDR vs. Flambient: Which Should You Use?
Besides HDR, some photographers prefer Flambient (Flash + Ambient) blending. Let’s compare:
- HDR Bracketing
- ✅ Pros: Fast, minimal gear, great for volume work.
- ❌ Cons: Risk of haloing or unnatural look if blending isn’t done carefully.
- Flambient
- ✅ Pros: Cleaner colors, more control over lighting, ideal for luxury homes.
- ❌ Cons: Requires flash equipment, more shots, longer setup and editing.
👉 For everyday MLS listings, HDR bracketing is usually the better choice. Flambient shines in high-end luxury listings where accuracy and polish are critical.
Common Mistakes to Avoid
- Using too few brackets: Leads to blown windows or noisy shadows.
- Inconsistent tripod height: Creates an unprofessional, uneven gallery.
- Ignoring reflections: Your reflection in mirrors or appliances can ruin otherwise great photos.
- Overcomplicating: More brackets, more flash, more gear ≠ better business. Keep it simple.
Final Recommendations
Based on thousands of homes shot and countless experiments:
- Use 5 brackets, 2 stops apart for most interiors.
- Keep aperture locked around f/8–f/9.
- Work efficiently with a clear workflow and checklist.
- Don’t overcomplicate—simplicity leads to profitability.
With today’s editing tools, Bracketing HDR in Real Estate Photography combined with hand-blended HDR can rival Flambient in quality while saving time and money.
You can also check our service.
Conclusion
HDR bracketing is the backbone of modern real estate photography. By mastering a simple, repeatable process, you can deliver photos that showcase homes at their very best—helping agents sell faster and boosting your reputation as a reliable photographer.
Remember:
- RAW + 5 brackets (±2 EV)
- ISO low, aperture steady, workflow simple
- Think like a buyer—use your images to guide them through the home
Follow these guidelines, and you’ll not only improve your photos but also speed up your shoots and grow your business.
✅ Want to see real examples of HDR-blended interiors? Stay tuned for our upcoming before-and-after photo series.