Real Estate HDR Photo Editing plays a crucial role in turning ordinary property photos into compelling visual assets that capture buyer attention.
Real estate photos are not just images – they are powerful marketing tools that form a buyer’s first impression. Even high-end cameras can produce raw images with issues like distortion, uneven lighting, dull skies, or soft interior details.
In this article, we break down 9 essential Real Estate HDR Photo Editing steps – from technical corrections to visual enhancement – so you can see the dramatic “Before & After” transformation and understand why Real Estate HDR Photo Editing is essential in modern real estate photography.
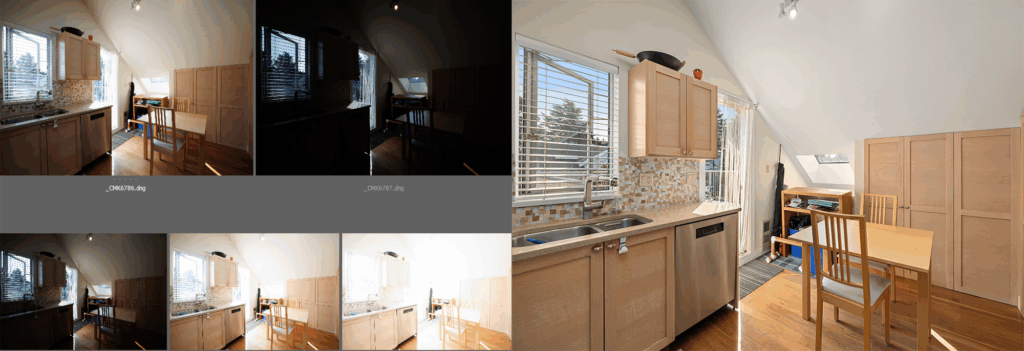
Before & After HDR Real Estate Photo Editing – Kitchen Interior by Realphoto94
1.Fix Lens Distortion in Real Estate HDR Photo Editing
Many wide-angle shots suffer from slight edge distortion, especially when capturing tight interior spaces. This results in bowed walls, curved edges, or a “fisheye” effect. We correct this using lens profiles in editing software, aligning verticals and horizontals for architectural accuracy.
2. Adjust Lighting, Colors & Sharpness
Real estate interiors often include mixed lighting sources like daylight, tungsten bulbs, and LED fixtures. We adjust exposure to recover lost shadow details, tone down blown highlights, balance the white point, and add subtle contrast and clarity.
3. Manual HDR Blending
Rather than relying on one exposure, we use a series of bracketed shots (e.g., -2EV, 0EV, +2EV) and manually blend them using layer masking techniques. This ensures the final photo has balanced lighting throughout – preserving viewable skies through windows and clear visibility in shadowed corners.
4. Balance Colors Across Ceiling, Walls, Floors, and Furniture
Uneven color tones caused by shadows, reflected light, or mixed sources can distort how a room is perceived. We isolate and even out hues and brightness across major surfaces to make the space cohesive and inviting.
5. Replace Window Skies
Sky replacement is crucial when the weather doesn’t cooperate. We carefully mask windows and insert sky textures that match the lighting and perspective of the room. The result is seamless and realistic, often with soft clouds or a blue gradient.
6. Replace or Black Out TV Screens
Blank or reflective TVs can distract viewers. We replace them with tasteful stock footage (e.g., landscapes or branded visuals), or fill them with a clean black layer to keep the viewer’s focus on the room.
7. Remove Cameras and Wall Imperfections
Unwanted elements like security devices, vents, stickers, or blemishes can make interiors look messy or dated. We use cloning and healing tools to remove these distractions, creating a flawless aesthetic.
8. Sharpen Details Precisely
Sharpening is applied selectively to highlight important textures without exaggerating noise or flaws. We target elements like countertops, cabinetry, and furniture fabrics – avoiding flat surfaces like walls or ceilings.
9. Ensure Overall Color and Sharpness Consistency
Listing photos need to look unified across platforms. We standardize the temperature, tint, exposure, and detail level throughout all images so viewers experience consistency and flow.
Would you like to add Before & After image sliders for each step? We can help design those for your blog or social media to boost engagement and conversions.
10. Grass Replacement & Lawn Enhancement
Dry, patchy grass can make exteriors look neglected. We replace it with lush, green lawns to boost curb appeal and create a “move-in ready” impression.
11. Water Enhancement (Pools, Ponds, Oceans)
Dull water reduces luxury appeal. We enhance pool water, ponds, or ocean views to look clear, blue, and reflective – adding vibrance and sophistication.
12. Turn On Interior & Exterior Lights
Dark interiors or unlit exteriors lack warmth. By digitally turning on lights, we make spaces feel cozy, welcoming, and visually appealing.